Users
The Users page allows you to:
- create and edit users
- assign roles and access zones
- manage login credentials (multiple per user)
- manage the user's Two-Factor Authentication (2FA)
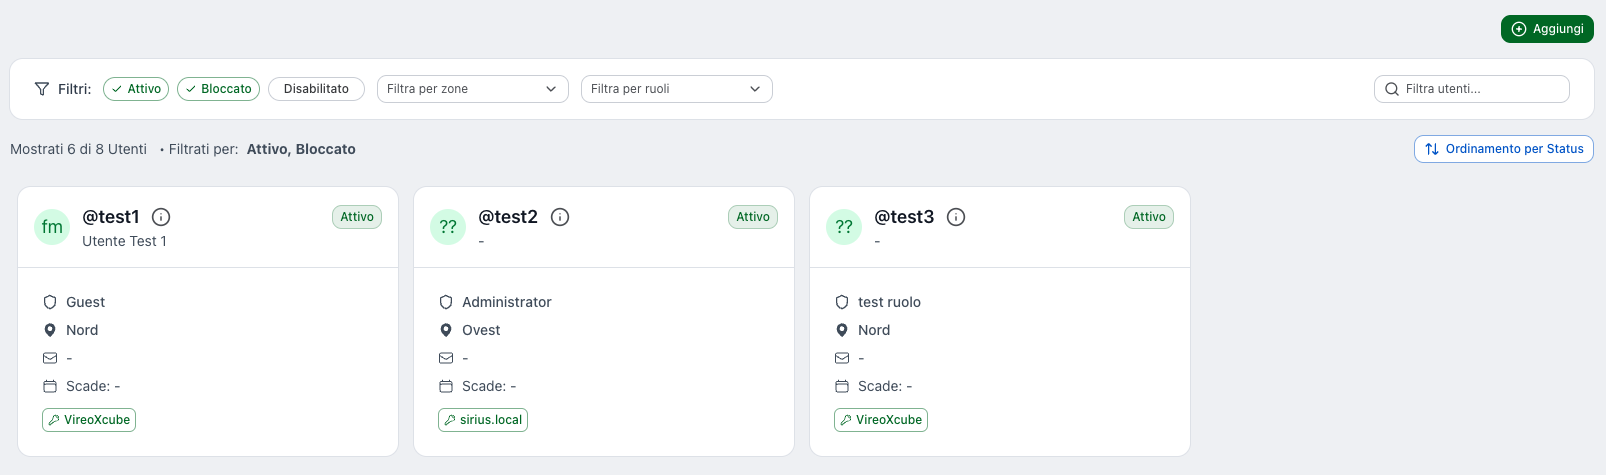
Users list
Users are displayed as cards. Each card shows the main information:
- Avatar with the user's initials (first and last name)
- Username (prefixed with
@) with the User ID icon next to it for copying the identifier to clipboard - First and Last name
- Status (e.g. Active, Disabled, Blocked): indicates whether the user can access the system. If the status is Blocked, hovering over the badge shows the blocked reason.
- Active: the user is enabled and can log in.
- Disabled: the user is disabled and cannot log in.
- Blocked: the user is blocked for security reasons or by an administrator's decision. This status is used to temporarily prevent access, for example after suspicious activity or an administrative action.
- Assigned Role
- Enabled Zones
- Account expiration date (Expires), if configured — highlighted in red if the account has expired
- 2FA badge, if Two-Factor Authentication is enabled for the user
- Identity Provider badges for the associated credentials (Internal, LDAP, SSO — up to 2 providers are shown; if there are more, the remaining count is displayed as "+N")
Clicking on a user card opens the user details, where (if authorized) you can edit profile and security settings.
Search and filters
At the top of the page you can quickly find users and narrow down the list:
- Search: Filter users… — filters by first name, last name, username, email and identity provider name
- Status filters: Active, Blocked, Disabled (by default Active and Blocked are selected)
- Zones filter: Filter by zones
- Roles filter: Filter by roles
- Clear filters: button to reset filters to their defaults (visible only when filters have been changed)
- Results summary: shows the number of displayed users out of the total and the active filters (e.g. Showing 5 of 12 users • Filtered By: Active, Blocked)
- Sorting: button to toggle between Status order and Alphabetical order. Status order follows severity: Blocked → Disabled → Active (within each group, users are sorted alphabetically by username)
Create a new user
User creation is a guided process in 3 steps.
Step 1 of 3 — User Information
Enter the basic data:
- Username (required)
- First name
- Last name
- Phone
- Account expiration (optional): set an expiration date. By default it is set to Never (no expiration).
Click Next to continue.
Step 2 of 3 — Profile
Configure permissions and access scope:
- Role (required)
- Zones (required)
Click Next to continue.
Step 3 of 3 — Credentials
Configure the login credentials (required):
- Name Credentials (e.g. Default)
- Name Provider (Identity Provider, e.g. VireoXcube)
- Additional fields depending on the provider, for example for an Internal Identity Provider:
- Password
- Repeat Password
Click Add to complete the creation.
User details
Opening a user shows a set of tabs.
Tab: Profile
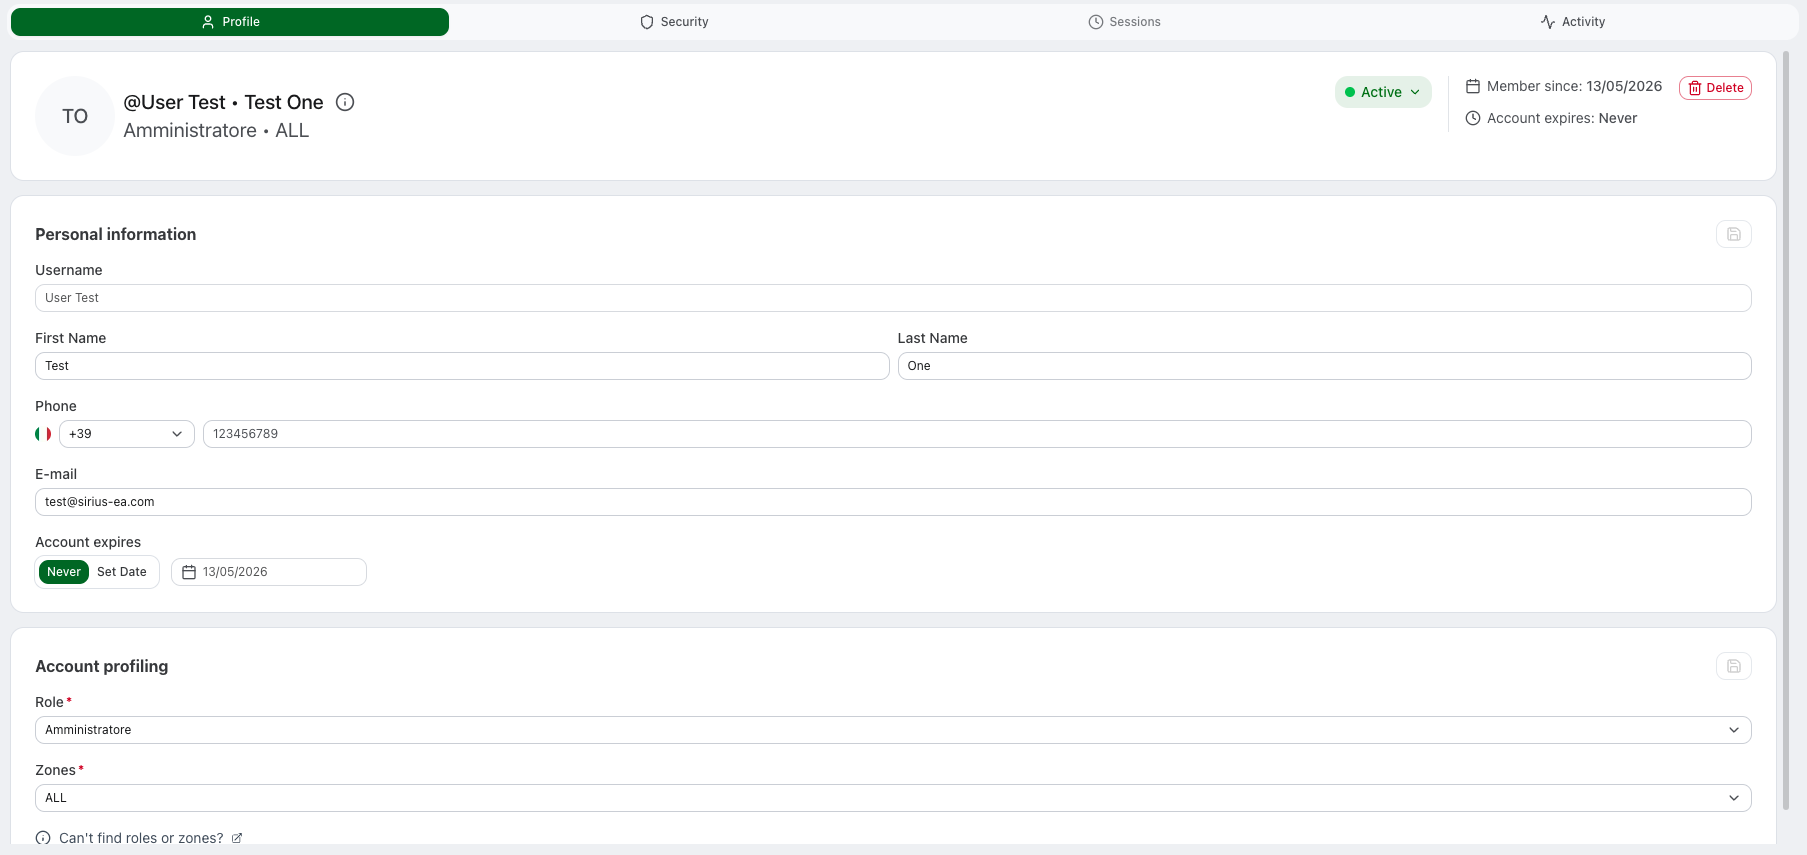
At the top of the page there is a user summary with:
- Avatar with initials, Username (with
@), Full name - User ID with copy-to-clipboard support
- Status tag (Active, Disabled, Blocked) — directly editable by users with appropriate write permissions. When changing the status to Blocked, a modal prompts for a blocked reason. If the user is blocked, the blocked reason is shown inline next to the status tag.
- Member Since: account creation date
- Account Expires: account expiration date (if configured, otherwise never)
- Delete: button to delete the user (visible only for users with appropriate permissions)
Below the summary are the editable sections:
- Personal information (Username read-only, First name, Last name, Phone, Email, Account expiration)
- Account profiling — for regular users: Role and Zones; for System Operators: Level
- Preferences (visible only on your own profile): Language, Appearance, Timezone, Date format
To save a block of information, use the edit icon in that section.
Security and credentials
Tab: Security


This tab includes:
- Two-Factor Authentication (2FA) status
- the list of configured Credentials
- management actions (reset, add, delete)
Two-Factor Authentication (2FA)
If a user has multiple credentials, they all share the same 2FA.
Available actions on your own profile:
- Enable 2FA: enables Two-Factor Authentication (visible only if 2FA is not active)
- Disable 2FA: disables Two-Factor Authentication
- Reset 2FA: resets 2FA
Available action on another user's profile (for users with appropriate permissions):
- Reset 2FA: resets the user's 2FA
After a 2FA reset:
- the user must set up 2FA again at the next login
- the QR code will be shown again during the setup process
Credentials (login methods)
A user can have one or more credentials. Each credential is linked to an Identity Provider.
Each credential shows its name, ID (copy-to-clipboard), provider name and type (Internal, LDAP, SSO, etc.).
Available actions on a credential (for users with appropriate permissions):
- Reset Password: resets the password for that credential (only for Internal Identity Providers)
- Delete: removes the credential
Available action on your own profile:
- Update Password: change your own password by entering the current password, the new password and its confirmation (only for Internal Identity Providers)
Credential priority
When a user has multiple credentials, they are ordered by priority. The credential with the highest priority appears first in the list.
To change the order, use the up/down arrows next to each credential. When you add a new credential, it is automatically assigned the highest priority (making it the first in the list).
Add new credentials
Use Add new credentials to add another login method for the same user.
Required fields:
- Name Credentials
- Name Provider
- Password
- Repeat Password
Use this when:
- you want to allow login through a different provider
- you want to add additional credentials for the same user
Account expiration
Users can have an optional expiration date set on their account. When an account expires:
- The user can no longer log in to the system
- The account is automatically treated as disabled
To set an expiration date:
- Open the user's profile
- Set the Expires date
User status
Users can have one of the following statuses:
| Status | Description |
|---|---|
| Active | User is enabled and can log in |
| Disabled | User is disabled and cannot log in |
| Blocked | User is blocked for security reasons or by administrator decision |
Frequently asked questions
Can a user have multiple credentials?
Yes. A single user can have multiple credentials, each linked to a different Identity Provider. This is useful, for example, as a fallback strategy: if the LDAP or SSO server is unavailable, the user can still log in using a second credential configured on the internal Identity Provider, preventing downtime and avoiding operational disruptions. Similarly, a user can have both SSO (Microsoft or Google) and internal credentials.
Does 2FA apply to all credentials?
Yes. 2FA is shared across all of the user's credentials.